Upgrading the Hard Disk in the IBM ThinkPad 600
|
|
 |
Copyright 1998-1999 The
Navas GroupSM, All Rights Reserved.
Permission is granted to copy for private non-commercial use only.
Posted as <http://navasgroup.com/tech/tp600dsk.htm>.
NOTE: This information was compiled by the author and is provided
as a public service. The author is not responsible for any errors
or omissions, or for any consequential problems that might result. USE
AT YOUR OWN RISK.
The IBM
ThinkPad 600 is a terrific machine at a fair price, except for the
cost of IBM
Upgrades -- the 6.4
GB hard disk upgrade (Model 02K0518) goes for a ridiculous $729 IBM
Price (as of this writing).
Be warned that this OEM drive will probably come with
no
documentation, and that there will be no end user IBM warranty
(end user IBM warranties only come with
retail packaging)
-- you'll have to depend on your reseller for a warranty, so choose one
with care.
Your existing drive may be only 9.5 mm think, whereas the Travelstar
6GT is 12.5 mm thick, but not to worry, the ThinkPad 600 can accept either
thickness. (The 12.5 mm drive will be about 1-1/2 oz heavier than the 9.5
mm drive.)
Installation is fairly simple if you are reasonably handy (but be warned
that you assume all risk -- this author does not
provide free support):
 |
|
(Click Reload on your browser
to restart the animation) |
-
Just to be safe, this author recommends flashing the latest ThinkPad
600 BIOS (Version 1.10, IBET41WW, 05-12-99, as of this writing) before
upgrading.
-
If necessary, decide now how to transfer your data. I recommend
Symantec's Norton
Ghost and a parallel connection to SparQ/SyJet/Jaz/Orb
drive or to another computer. (A network connection is faster, but you'll
have to get network drivers working in DOS mode.) You can download a free,
fully-functional 30-day "eval"
copy of GHOST.
-
Think now about what you will do with the old drive. If you
will be selling it, plan to erase it (just deleting files
is not enough) after you have verified that your data has
been transferred successfully. (You can freely download
Wipe, a disk erasing utility, from IBM.)
-
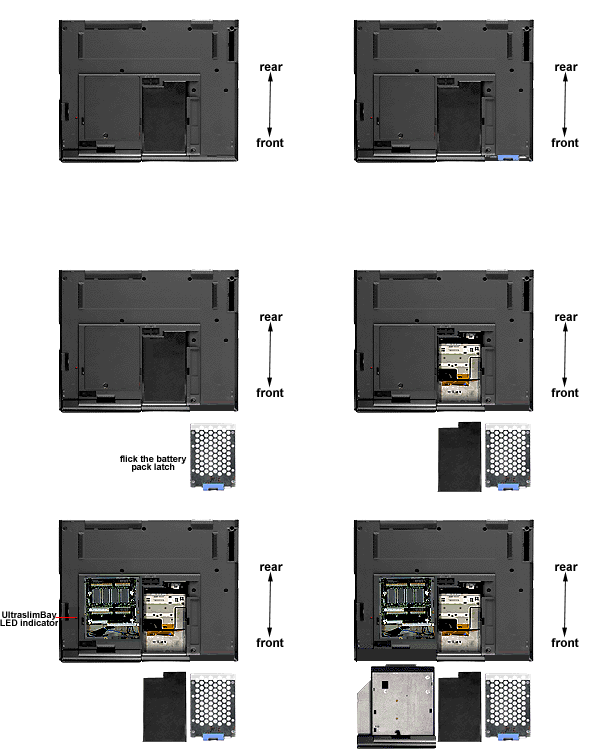
Disconnect AC power and remove the battery. Turn the machine upside down.
(See picture above)
-
Remove the drive retaining screw (near the front of the case) with a coin,
and then gently pry off the nearby drive cover. Grab the plastic tab, and
carefully slide the old drive out of the front of the machine.
-
Remove the 4 side screws holding the perforated mounting bracket to the
old drive, and then gently pry off the bracket. (It's held in place with
mild sticky tape.)
-
Attach the perforated mounting bracket to the new drive with the 4 screws.
Be sure to orient it the same way it was oriented on the old drive.
-
Gently slide the new drive into the drive bay, making sure that you don't
have it upside down. Press the drive in to seat the connector firmly.
-
Tuck in the plastic tab; replace the drive cover; and reinstall the drive
retaining screw.
-
Reinstall the battery and connect AC power. The BIOS should recognize the
new drive automatically when you power the machine up.
-
This author recommends running BIOS diagnostics on the new disk before
using it. To access the BIOS diagnostics, hold down the F1 key while turning
on the machine.
The author tested this successfully on a ThinkPad
600 Model
2645-35U and Model
2645-A1U.
Email comments and suggestions to John Navas
 [The Navas Group home page]
Trademarks belong to their respective owners.


