Posted as <http://navasgroup.com/tech/autoplay_vcd.htm>.
GENERAL NOTES:
A pure Video CD (VCD) will not Autoplay (automatically play the video on an inserted disc) in Microsoft Windows without some sort of "helper" application. Although there are several ways to create a Video CD that will Autoplay without a "helper" application, the following procedure, based on Windows Media Player, is arguably the simplest, easiest, and cleanest.
Both of these two files must be placed in the root directory of the Video CD, as described below. They should not interfere with playing the Video CD on a Video CD or DVD player.
The contents of the AUTORUN.INF text file are always (assuming the .ASX file is named VCD.ASX):
| Method 1 | Comments |
[autorun] ShellExecute=VCD.ASX |
The 2nd line (ShellExecute) uses the registered .ASX file association to process the .ASX Windows Media Metafile. The registered application is usually (but not necessarily) the current version of Windows Media Player; if so, playback begins in a default window. Method 1 is preferred unless you want playback to begin full screen, in which case use Method 2. |
| Method 2 | Comments |
[autorun] ShellExecute=mplayer2 /fullscreen VCD.ASX |
Method 2 is used to begin playback full screen. It should explicitly invoke the older version (6.4) of Windows Media Player, which (unlike the latest version) supports the "/fullscreen" parameter. The older version apparently remains installed even when the newer version is installed (on Windows XP at least). |
The .ASX file contains text commands that allow you to control Windows Media Player. Simple examples:
| Play single video clip | Comments |
<ASX Version = "3.0">
<Title>Name of my Video CD</Title>

  <Entry>
    <Title>My Video Clip #1</Title>
    <Ref href = "MPEGAV\AVSEQ01.DAT" />
  </Entry>

</ASX>
|
|
| Play two video clips | |
<ASX Version = "3.0">
<Title>Name of my Video CD</Title>

  <Entry>
    <Title>My Video Clip #1</Title>
    <Ref href = "MPEGAV\AVSEQ01.DAT" />
  </Entry>

  <Entry>
    <Title>My Video Clip #2</Title>
    <Ref href = "MPEGAV\AVSEQ02.DAT" />
  </Entry>

</ASX>
|
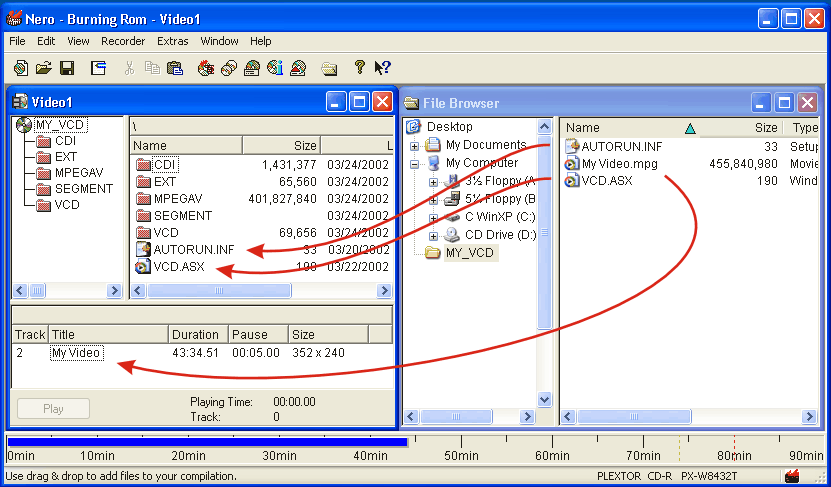
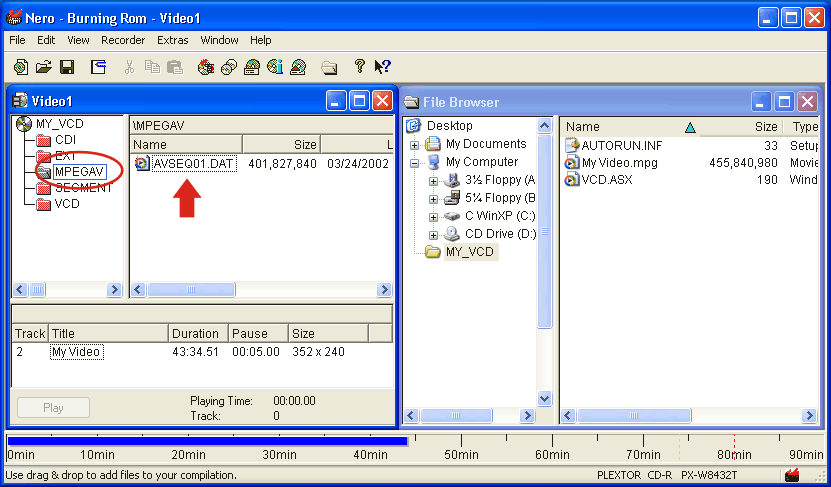
Getting the .ASX Windows Media Metafile and the AUTORUN.INF file into the root directory of a Video CD can be easy or hard depending on the CD authoring software you use. In Nero Burning ROM (version 5) it's easy: after a Video CD compilation (layout) has been created, use the clip names in the "MPEGAV" folder (directory) to create the .ASX file, drag and drop the .ASX and AUTORUN.INF files into the upper right pane of the compilation window (set to "\" root), and then burn.


Trademarks belong to their respective owners.